This blog is an exploration of the role of art and design in our current cultural context. It will cover techniques, software, project ideas, the role of history and much more!
The Shape Builder Tool is a great tool to create, edit, combine and dissect your Illustrator Objects (shapes) in a more organic way. The Shape Builder Tool shares many similarities to the Pathfinder Window.
So what are the differences? The Shape Builder Tool provides you (the designer/art student/Illustrator Experimenter) with the opportunity to work and create a workflow that will feel more natural than the Pathfinder Window. The Shape Builder Tool provides the opportunity to push the what was/is possible with the Pathfinder Window further. (If you are not sure what the Pathfinder Window is read my blog on the Pathfinder Window.)
Let's Experiment!
Where is the Shape Builder Tool?
Shape Builder Tool
Shape Builder Tool Fly Out
As you can see from these images the Shape Builder Tool has a Fly Out Menu associated with it. Therefore if you do not see the Shape Builder Symbol on the Tool Bar select from the Fly Out menu above.
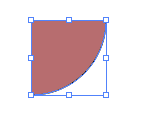
1. Create the Objects that you would like to work with on your ArtBoard in Illustrator. Make sure that the Objects that you will be working with are active. When an Object is active it is selected. We always know that an Object is selected when we see its anchor points and paths as shown below.
Two Overlapping Active Objects
2. Working with the Shape Builder Tool hover over the Objects and Click as shown in the three below images.
Image 1
Image 2
Image 3
3. Through hovering and clicking the above Objects/Shapes we have created three separate Objects. Now working with Selection Tool (Black Arrow) and Direct Select Tool (White Arrow),
we can move these shapes/objects independently as shown below in Images 1b-3b:
Image 1b
Image 2b
Image 3b
4. Here is another example of steps to follow to work with overlapping objects with the Shape Builder Tool. In the above example I showed you how to Divide a group of Overlapping Objects/Shape. In the below example we will exclude the overlapping sections.
Overview and Steps for working with the below shapes:
1C- Make sure all Object are selected.
2C-5C - With Shape Builder Tool, click all areas where the shapes overlap.
6C- Deselect
7C- 10C working with the Selection Tool or Direct Select Tool select the overlapping shapes and delete.
11C- Final Result.
Image 1C
Image 2C
Image 3C
Image 4C
Image 5C
Image 6C
Image 7C
Image 8C
Image 9C
Image 10C
Image 11C
Here is a video to help with the Shape Builder Tool:
An Overview of the Pathfinder Window
The Pathfinder Window in Illustrator provides a great way to create and dissect new interesting shapes.
In order to open and experiment with the Pathfinder window follow the below steps:
1. Window > Pathfinder
Pathfinder Window
(The Pathfinder Window contains a series of commands that can be applied to your shapes in Illustrator. The best thing to do is to create your shapes and experiment! As you hover your mouse around this window the commands will appear.)
2. Select and draw two overlapping shapes. Use the Shape Tool on the Tools Panel.
Shape Tools
2 Overlapping Shapes
3. Make sure that both Shapes are selected and then choose one of the pictures on the Pathfinder Window.
Selected Shapes
(In Illustrator an Object is selected if you can see its anchor points and paths. In order to select multiple shapes use you black arrow, the Selection Tool, and hold down Shift.)
1. Unite
2. Minus Front
3. Intersect
4. Exclude
Examples 1-4 are the first row of commands on the Pathfinder window. They specify Shape Modes.
5. Divide
6. Trim
7. Merge
8. Crop
9. Outline
10. Minus Back
Examples 5-10 are from the 2nd row of the Pathfinder Window, located in the Pathfinders section.
The Pathfinder Window has great tools to use for designing logos, creating interesting patterns and so much more.
So, What exactly is a vector?????
It is one thing to read about the differences between Vector and Raster Art but true clarity comes when we see these differences.
To re-cap from my earlier post a vector drawing can be described as a clean, visual composition that can be scaled without losing resolution. Vector art is great for creating
wireframes, logos, icons, complex shapes, setting type and so much more.
Illustrator is Adobe's Vector Drawing software that integrates beautifully with Adobe's other Programs (Photoshop, InDesign, Flash, AfterEffects, etc).
Whereas Illustrator is a Vector based program, Adobe Photoshop is raster imaging software. When working with raster images we are limited by pixels and resolution.We constantly have to watch the DPI (dots per inch) or the PPI (Pixels Per Inch) settings . There are places where raster imaging is exactly what we want. Pixels are perfect for photos. A concentration of colored pixels is what creates a digital photograph.
(One thing to keep in mind is that sometimes you will have to take a vector image and turn it into
a raster if you are taking that image to the web, a mobile device or an e-tablet.)
Now let's look at some examples!
Example 1: Vector Logo on Left, Raster Logo on Right
In the above example, Example 1, we see a Vector Graphic on the Left and a Raster Graphic on the right. Upon first glance the two images don't look much different. Now let's zoom in to see the differences!
Example 2: Zoomed in Raster Image
In Example 2 the differences become clear. Our raster image is based on pixels. When we zoom in we see these pixels.
So, when we work with our raster images we have to continually watch the resolution. The more pixels an image has the higher the resolution. The higher the resolution the larger the file.
When working with raster images if we are going to print the image we usually work at a higher resolution. This resolution is often set to 300 ppi (pixels per inch). When we are preparing an image to be used on the web we often work at a lower resolution such as 72 ppi (pixels per inch). One of the reasons why we work ata lower resolution when we are preparing an image for the web is so the file size is smaller and will not slow down the person's internet connection as he or she waits for it to download.
Example 3: Zoomed in Vector Image
In Example 3 we see what happens when we zoom in on our Vector Image. This graphic is not based on pixels. Instead, underlying the shapes, colors, and type are mathematical equations, making this graphic resolution independent.
We could describe the edges of this image as being crisp and clear.
Illustrator is a vector drawing program used to create such things as logos,
illustrations, maps, infographics, charts, comics, diagrams and more! Underlying the shapes and lines of the illustration (the vector image) that we see are mathematical equations. Since this image is based on mathematical equations we can scale it to whatever size we wish without loosing resolution.
The opposite of a vector image would be a bitmap image, also known as a raster image. These images are formed through grids of dots (pixels). The image is created through pixels of color. The more pixels the image has the higher the resolution. Images with fewer pixels are low resolution.
So, now that we have clarified the differences when do we know what type of image we should use? What are the advantages of creating a vector image over a raster image?
A few of the main advantages of Vector images are as follows:
can make larger without loosing resolution
smaller file size
great for logos, infographics, charts, "cartoony" images
Some of the disadvantages of Vector images are as follows: